Total Pageviews

Sunday, January 15, 2012

Lesson 19 - Mousses & Souffles

In this lesson, we made chocolate soufflé, grand marnier soufflé, and cheese soufflé, as well as white and dark chocolate mousse.  This was definitely one of the most tasty lessons we had, and I am not much of a sweets person.

I did not think I would like the mousse because haven't cared for it before, but this mousse was soooo good!  I am going to post the mousse recipes because they are easy and don't have a ton of ingredients.

As for the soufflés, I was really concerned. I had never made them before and knew how temperamental they could be. A tip from our book: 'since the soufflé is a delicate mixture, it is important to prepare it just before baking and to serve it right away. Whipped egg whites, whether cooked or uncooked, deflate quickly'.

All in all, aside from nearly stirring my arm off, this was one of my favorite lessons.

These are the ingredients we saw upon walking into class (OH YEAH!!!):


Chef Bruno folding his mousse:


Finished product - chocolate mousse:


Demo of the cheese soufflés (made with gruyere, flour, milk, egg yolks, salt, cayenne pepper, nutmeg, egg whites, butter, and bread crumbs):


Chef Bruno's cheese soufflés:


Chef made us some salad to go with the cheese soufflés for dinner.  Also, one of the other classes brought us some freshly made pizzas (best dinner ever!):


Our cheese soufflés:


One of the pizzas brought to us:


Our white and dark chocolate mousses (heavenly):


Our chocolate soufflés (made with flour, butter, milk, bittersweet chocolate, egg yolks, dark rum, vanilla extract, egg whites, sugar, and powdered sugar):


Grand marnier soufflés (made with milk, vanilla bean, egg yolk, sugar, flour, grand marnier, egg whites, powdered sugar, and butter)


Another class brought us this berry dessert, which was fantastic!


Everything was SOOOO good - it was the first time I thought I might like being a pastry chef.  Here are the recipes for the mousses:

Dark chocolate mousse:

5-1/4 oz bittersweet chocolate 
14 oz heavy cream
3 egg whites
1 oz sugar

Chop the chocolate and place it in a bowl. Set over a double broiler (aka bain-marie) at a low simmer. 
Stir the chocolate gently until completely melted.
Turn off the heat and leave the bowl over the double broiler.
Beat the cream over ice until it forms soft peaks. Set aside and hold at room temperature.
In another bowl, whip the whites. When soft peaks form, add sugar gradually until the whites form strong peaks. Be careful not to overbeat.
Remove chocolate from the double broiler and, using a whisk, fold in the egg whites all at once. 
When whites are almost completely incorporated, fold in the whipped cream.
Cover the mousse and refrigerate for 1 hour, or until set.

White chocolate mousse:

25-1/2 oz heavy cream
14 oz white chocolate, chopped
3 egg yolks
1 oz sugar
2 sheets of gelatin, softened

Bring 5 oz of heavy cream to a simmer, then add the gelatin.
Beat the egg yolks until they thicken and become pale yellow.
Remove the heavy cream-gelatin mixture from the heat. Set aside to cool for 1 minute, then temper in the egg yolks.
Pour the thickened cream mixture over the chopped chocolate, stirring occasionally until the chocolate melts and the mixture is smooth. Set aside to cool.
Whip the remaining heavy cream to soft peak.
When the chocolate has cooled to room temperature, gently fold in the whipped cream all at once.
Let the mousse set for 1 hour before serving.

Enjoy!


Tuesday, November 8, 2011

Lesson 18 - Doughs and Tarts

For Lesson 18, we learned how to make doughs and tarts.  We learned to make a savory dough (pate brisee) and a sweet dough (pate sucre).  The pate brisee can be made with or without egg. We used the savory dough to make an onion tart (pate brisee without egg) and a quiche (pate brisee with egg). We used the sweet dough to make an apple tart and a pear tart. 

The onion tart is made with onions, butter, vegetable oil, and bacon. The custard filling is made with an egg, and egg yolk, milk, cream, salt, pepper, nutmeg, and egg wash. The pate brisee without egg is made with flour, salt, sugar, butter, and water.

The onion tart was surprisingly good.  This is me with our onion tart (Amy and I worked as a team):


A closer look at the onion tart:


2nd, we made the quiche.  The quiche is made with vegetable oil, bacon, and gruyere cheese. The custard filling is made with milk, heavy cream, egg, egg yolk, salt, cayenne, nutmeg, and egg wash. The pate brisee with egg is made with flour, salt, sugar, butter, and egg.

Here is Amy with our quiche:


The quiche was FANTASTIC!


The onion tart (left) and the quiche (right):


Next, we moved on to sweet doughs.  First we made an apple tart.  The apple tart filling is made with apples, lemon, water, and sugar (made into an apple sauce type of consistency).  The topping is made with apples, lemon, and butter.  The finish is made with apricot glaze and water. And the pate sucre (sweet dough) is made with powdered sugar, butter, eggs, salt, flour, and baking powder.

This is our apple tart before baking:


Chef Bruno spun a sugar flower to put on his apple tart.  This is his finished result:


This is the apple tart that Amy and I made:


Our final project was a pear tart.  The pear tart is made with almond cream, pastry cream, and the pate sucre.  Almond cream is made with almond paste, sugar, butter, eggs, almond extract, almond flour, and regular flour.  The pastry cream is made with milk, a vanilla bean, egg yolks, sugar, flour, and cornstarch.  The pastry cream and the almond cream are mixed together to make the filling and then the filling is topped with pear slices and brushed with apricot glaze. The pate sucre ingredients are listed above the apple tart picture.

This is our pear tart (very good if you like almond flavor):


That was the tarts and doughs lesson.  Only 4 lessons left.  The next lesson is mousses, soufflés, & bavarian creams. Yum!


Tuesday, November 1, 2011

Lesson 17 - doughs and custards

Lesson 17 was dough and custards.  I was a little worried about this lesson because Chef Bruno has been a pastry chef for many years, so I know that he would expect perfection from us (even more than normal).  

The cream puffs and eclairs are made using pate a choux, which is a pastry dough that is cooked twice; once on the stove top and then baked.  Choux is french for cabbage and refers to the hollow cabbage shaped balls that the dough makes when cooked.

Chef Bruno made these swan heads from the dough that we created:


These were the eclairs and cream puffs before they were baked:


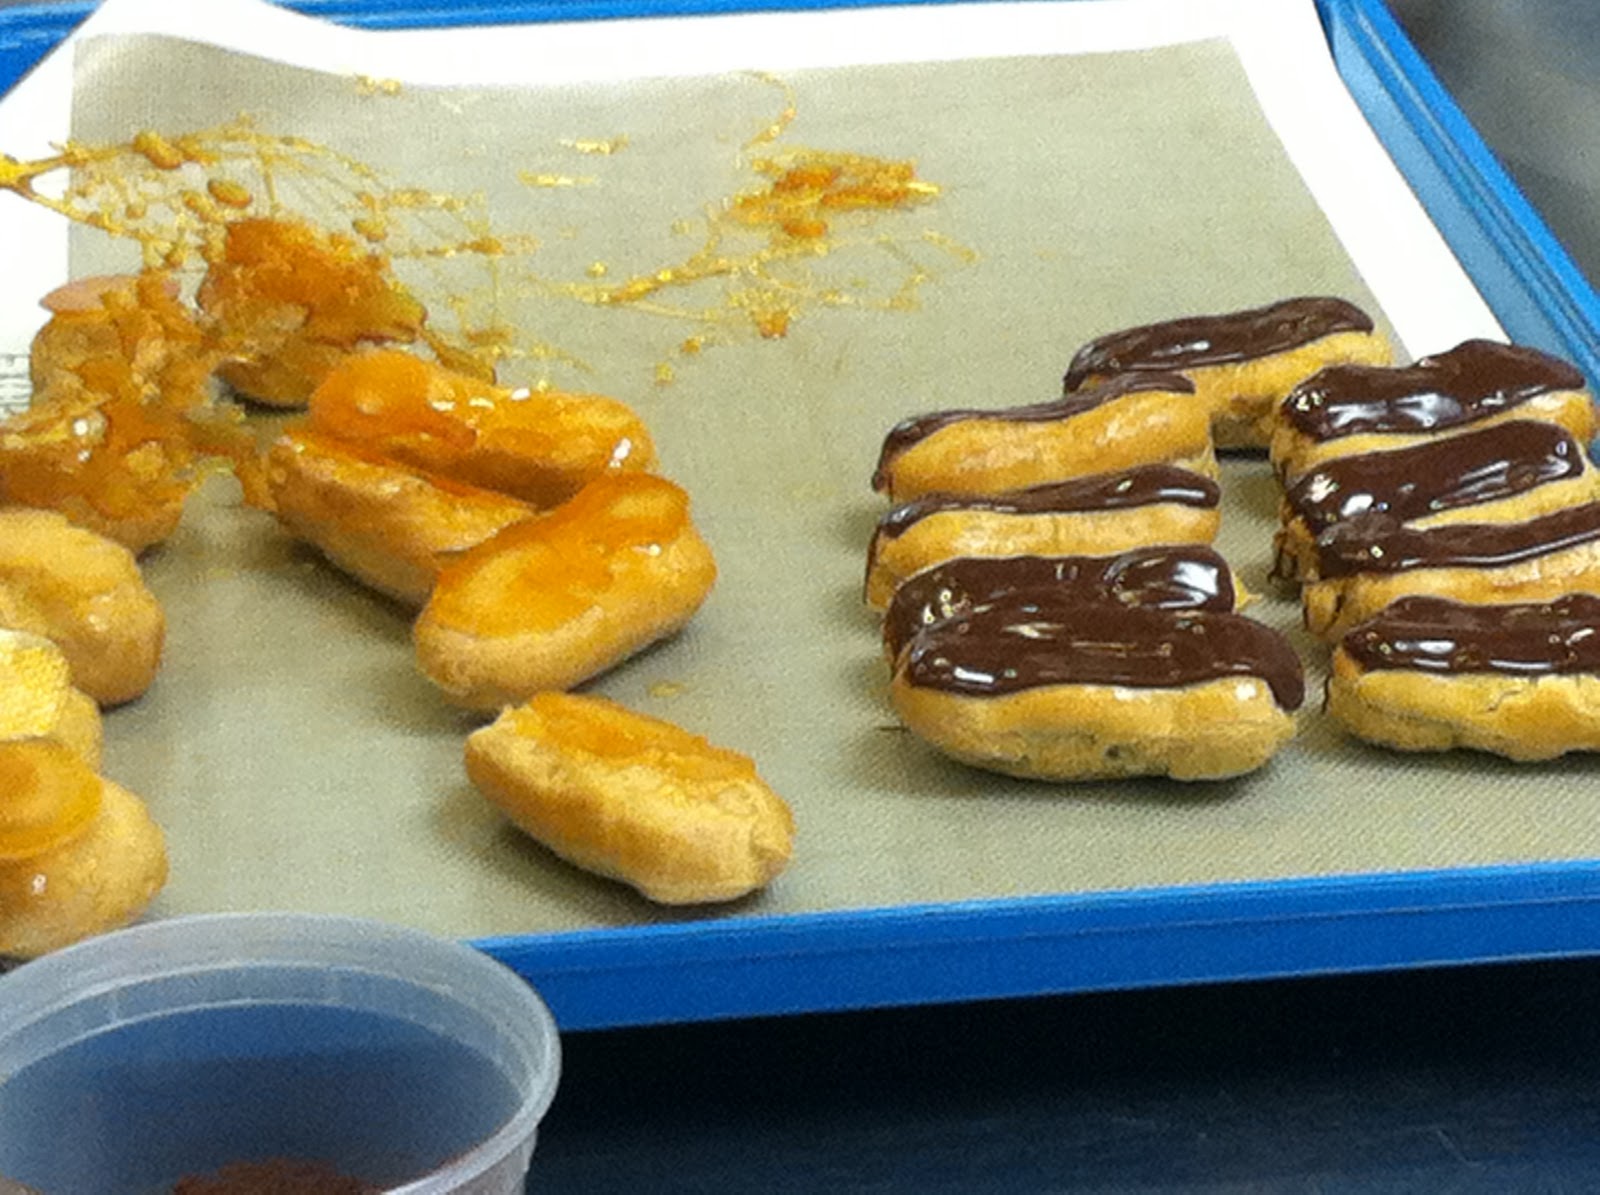
Chef Bruno's eclairs - some with chocolate topping and some with caramel topping:


Chef Bruno's final plate with the eclairs, cream puff, and cream puff swan:


This is creme caramel custard, which is a lot like creme brûlée.  They were very good!


This is my swan (may I just say that nothing compares to hand made whipped cream):


My cream puffs with my swan:


My eclairs (eclairs are filled with pastry cream and topped with chocolate fondant):


We also made pots de creme, which is made with the same custard recipe as the creme caramel, but vanilla bean is added. Even though it wasn't called for in the recipe, we added coffee flavoring. The result was pretty tasty!


For dinner, Chef Bruno made us savory puffs with ham and cheese in them:


He also made us a fantastic salad with a mustard vinaigrette dressing: 


This is Amy Lee, my table mate.  We had so much fun together! 


The serious amateur pastry chef would come into our class from time to time to beg for food.  I called him 'the yelling chef' because he would come in and speak boisterously (i.e., very loudly and with many hand gestures) to Chef Bruno in French. Chef Bruno said that the reason he was so loud is because he is from Southern France (unlike Chef Bruno, who is from Northern France). He offered to pose for this picture:


He brought in this sugar sculpture that he made:


He insisted on posing for another picture (this guy cracks me up!):


Here is another picture of the sugar sculpture:


This is my classmate Coba Cao, a total sweetie who was always there to get ice and do the heavy lifting:


Classmate Sheryl Andersen, who is a total riot. We laughed so hard together!!! 


In the next class, we make doughs and tarts.


Lesson 16 - Eggs

I thought this lesson would be simple, but by the end, I was wishing we could go back to cutting chicken or fish!!!

We made 7 different types of eggs...  We went through these in no time flat (no pun intended):


We learned about rolled omelettes (french spelling) and flat omelettes. Rolled omellettes are runny in the center and not supposed to have color. Flat omelettes are firmer and lightly browned.  We were supposed to make a rolled omellette, but mine ended up a little brown (this was my second attempt because the first one did not work out at all!): 


Next, we made poached eggs.  Not so easy! Turns out I had to make them twice as well, because someone measured the vinegar, but not the water for me (though I will not name names!):


Because of having to do the omellette twice and the poached eggs twice, when we were getting ready to prepare eggs cooked on a plate, my classmate gave me two plates:  Ha ha.


Eggs cooked on a plate are just eggs cooked in a buttered dish in the oven until the white is no longer runny.  Here are mine:


Next up were scrambled eggs.  The french method for scrambled eggs are wet. A little too wet for my taste...  Okay, the trick is to break eggs, one at a time into a bowl and whisk. Add 2 tsp of cream per egg. Heat butter in a pan until hot. Pour the eggs in and lower the heat. Cook, stirring constantly. Remove them from heat when they are soft and thick. Personally, I like my eggs not to be wet, because wet eggs look and feel underdone. But we had to do what the chef wanted.  I took a picture after a bite was taken, and I think it looks kind of like pacman:


Classmate Coba missed this class, but we had a guy that was auditing the class to see if he would want to take it in the future.  His name was Alvin.  I took this picture of him and then sent it to Coba saying that we replaced him!  He wrote back 'who is that guy?!?!?'.  It was pretty funny.


Next up: baked eggs with cream. These were made with cream, cooked in a saucepan until reduced by 2/3rds. Then you butter and salt ramekins. Break eggs one at a time into a bowl, but do not stir or whisk. Place an egg in a ramekin, then pour halfway to the egg with the reduced cream. Place ramekins on a shallow pan and pour boiling water to half way up the side of the ramekins. Cook at 350 degrees for 8-10 minutes.  Yum! Actually, I don't know if they were good or bad - I had had way too many eggs to even consider trying these!


Next up was a basque style omelette.  I almost brought it home to see the look of horror on my husband's face because it has green peppers and long onions, which he hates with a passion... Instead, it went into the trash...  


Last up were stuffed eggs, chimay style.  They remind me of deviled eggs, but with mushrooms, cream, and cheese.  The eggs were boiled (the secret to boiled eggs is making sure the egg is room temperature, put in a pan and just add enough cold water to cover and bring to a roiling boil, then simmer for about 10 minutes). The stuffing is made with the yolks, parsley, and mushroom duxelles.  The eggs were then stuffed and covered with mornay sauce (béchamel with grated gruyere cheese). I wish we had made these first because they looked really good, but by the end, I never wanted to see another egg again!


Next lesson is doughs and custards - we begin the pastry portion of the course!!!

Thursday, October 27, 2011

Lesson 15 - Beef & Veal

I have to admit that I was really tired of cutting meat by now...  Now we were on to beef and veal.  What would we have to do this time?  Cut up a whole cow?  Or worse yet, a calf?!?!?  Yuck.

In this lesson, we learned about dry cooking techniques (grilling and broiling) and moist cooking techniques (boiling, poaching, and simmering). For the steak, we used the grilling method and for the veal we used the submersion poaching method.  There are two types of poaching: one is submersion poaching, which is completely covering the food with liquid, the second is shallow poaching, which is covering the food halfway with the cooking liquid.

The recipes we made in this lesson were grilled sirloin steak with pommes frites and veal blanquette with rice pilaf.  Oh yes, no chicken to cut!

And it turns out, no whole cow or calf. We had a large block of steak that the chef carved for us and we had to trim. Here is the meat:


We grilled the steak, double fried the fries (if they are thick cut, you first fry them at a 300-320 degrees until tender, then at 350-375 degrees until golden brown and crispy. Drain on a paper towel and add salt immediately, so that the salt will stick). The steak was served with béarnaise sauce. The result was fantastic - steak, french fries, béarnaise sauce:


As for the veal, we trimmed the meat into cubes then poached it and rinsed the meat and the pot. We pealed the usual vegetables (carrots, leeks, celery, onions), added a clove, thyme sprig, peppercorn, and garlic and put them in a cheesecloth bundle.  We then covered the veal in stock, added salt and brought to a boil, skimmed, added the cheesecloth vegetables and returned to a simmer.  The mixture had to be simmered without bringing to a boil, loosely covered for about an hour.  To check to see when veal is done, pinch one of the pieces between your fingers and the veal should crush easily; not spring back.

The sauce is the reserved poaching liquid run through a chinois. Then we made a roux, added the poaching liquid and simmered until the sauce thickened.

Here is the veal (the garniture is pearl onions and carrots (cooked in water, sugar and butter, covered in parchment paper), quartered mushrooms (tossed in lemon juice and butter and cooked covered in parchment paper), and we served all over rice pilaf:


That is it for the veal and beef.

Side note: at one point, classmate Sheryl said to the chef, proudly, 'I am a woman, if you haven't figured it out', to which Chef Bruno said, 'yeah, I did realize that'. Then I said, 'yeah, you realized it when she asked you to check her breasts (see duck lesson)!'  Too funny!

The pastry class surprised us with a beautiful chocolate dessert:


Next lesson is the incredible, inedible and edible, egg.

Monday, October 10, 2011

Lesson 14 - Lamb

I wasn't particularly excited about cooking lamb.  The only time I have ever had it, it was in a sausage and it made me sick.  Yes, barfing sick.

The recipes we made were lamb stew with seasonal vegetable and chicken fricassee with seasonal vegetables.

Chef Bruno suggested that maybe the reason I didn't enjoy the lamb sausages is that maybe it wasn't lamb, maybe it was mutton.  What is the difference, you ask?  Lamb is the meat of sheep less than 1 year old.  Mutton is sheep more than 1 year old.  Mutton is less tender than lamb and much more gamey.

We learned the difference between stewing and braising.  Stewing is made with more liquid and uses smaller pieces of meat.  Braising typically uses less liquid and a larger piece of meat. Either method can be prepared in the oven or on the stovetop or both.

Tips for choosing lamb: look for good marbling and a firm texture.  The lamb should be pink and the fat should be pale or white.

This was our lamb:


I admit, this next picture is especially unappetizing:


For the lamb stew, we cut the lamb into small cubes and browned them in oil.  The lamb was then removed from the heat and we then added chopped carrots and onions the the pan and cooked until lightly colored.  Then the garlic was added and cooked for one minute.  After that, the meat was added back, as well as tomato paste and flour, and stirred.  We then added water to cover and boiled.  After boiling, the pan is put in the oven for an hour at 350 degrees.  The vegetables for the garniture were carrots, pearl onions, turnips, green beans, peas, and potatoes, all cooked separately (except the carrots and turnips, which can be prepared together).  The result was unexpectedly good (not gamey at all and I thought it was beautiful)!


For the chicken fricassee, we cut a whole chicken into quarters, seasoned both sides, and seared, skin side down, in butter. The chicken was then removed from the pan.  We then added onions to the pan and sweated them until translucent.  Flour was added to the mixture and stirred.  Chicken stock was then added and the mixture ws brought to a simmer before returning the chicken to the pan and simmering again, covered, for 20 minutes.  The garniture was prepared exactly the same as it was for the lamb (except no potatoes).  Chef Bruno made a wonderful rice pilaf to serve with the chicken.  We strained the sauce and cream was added to make it a thick, chicken flavored white sauce.  Very tasty:


Next lesson: Beef & Veal!